
Black and White Photography Tips
1. Shoot in RAW
I know many readers of DPS can’t shoot in RAW (because their camera doesn’t offer it) or don’t shoot in RAW (because they either don’t know how or don’t like to) but for the most control in the post production phase of converting your color images into black and white ones – you’ll want to shoot in RAW if your camera does allow it. Of course shooting in JPEG doesn’t stop you shooting in black and white – but if it’s an option, give RAW a go, you might be surprised by what it offers you in post production.
2. Shoot in Color
If your camera doesn’t allow you to shoot in RAW (or you choose not
to) – shoot in color and do your conversion to black and white later on
your computer. While most digital cameras offer you the option to shoot in Black and White (and can produce some reasonable results) you have more control over your end results if you have the color data to work with in your conversion on your computer.
Update: There is an exception to shooting in Color and it’s when you’re taking note of point 1 above (shooting in RAW). When shooting in RAW and switching to Black and White mode you see your results in the LCD in black and white but the camera actually records all of the information (including color) – the best of both worlds. But if you’re shooting in JPEG – shoot in color and do the conversion later.


3. Low ISO
Shoot with the lowest possible ISO possible. While this is something that most of us do in color photography it is particularly important when it comes to black and white where noise created by ISO can become even more obvious. If you’re after this ‘noise’ (or grain) you can always add it later in your post production – but it’s harder to go the other way and take noise out.4. When to Shoot
Many digital photographers actually prefer to shoot images for Black and White in low contrast situations. So an dark or overcast day can be a great time to shoot out door shots.
Ironically these are the days that those who shoot only in color sit at home complaining about the ‘poor light’. So next time you find yourself with a dark and gloomy day – shoot some black and white shots.


5. Composition
Most of the general tips on how to compose or frame a good shot apply just as well to black and white photography as they do when shooting in color – however the main obvious difference is that you’re unable to use color to lead the eye into or around your shot. This means you need to train yourself to look at shapes, tones and textures in your frame as points of interest. Pay particularly attention to shadows and highlights which will become a feature of your shot.

Digital Camera Magazine (UK) has a useful feature in their October issue on Black and White photography. It contains a lot of good information – but one of the topics that they cover was on how to ‘see in black and white’.
In it the author shares 4 ‘key ingredients’ of that will help you to visualize whether a scene will work as a black and white image or not. The titles below are from the article – the thoughts are mine (and I’ve added one of my own tips too)
1. Look for Contrast
One of the elements that can give interest to a black and white shot is contrast. Because you can’t use color to distinguish one element of your image from another the tonal variances become all the more important. This doesn’t mean you need to look for stark contrasts in every shot you want to convert to black and white – the subject matter will come into play here – but you should ponder how the contrast will come into play when composing your shot.


2. Wait for the Right Light
Linked to contrast, the lighting in a black and white shot can be very important. For example – h3 or direct lighting will often add to contrast. Side lighting will reveal any texture that a subject might have (and in portraits will accentuate features) and light from any one direction will create shadows. All of these techniques can add interest to a black and white image – however they can also be distracting – so play with light with care.3. Shapes and Patterns
Patterns or shapes that can sometimes almost go unseen in color (due to the color itself drawing attention) can come alive in a black and white shot. Black and White shots that rely upon pattern can often take on an abstract quality.4. Capture Texture
I’ve already mentioned this above when talking about side lighting – but revealing the texture of a subject can add a new dimension to an image. The sidelight does this by creating shadows.

A Tip for Black and White Landscapes
One more quick tip of my own for those wanting to try black and white landscape photography:When shooting black and white landscapes look for ‘active skies’. I was given this advice by a photographer a few months ago who showed me some examples of his own black and white landscape work. The skies in his images were breathtaking with wonderful cloud formations and what often looked like storms about to break. Having skies with so much ‘action’ in them added mood and a really dynamic look and feel to his images. Without this active element the images looked rather empty and dull. I think the same principle could be applied to most types of black and white images that have large parts of them dominated by any one thing. If a large part of your image is all the same tone the image can look quite lifeless (unless of course you’re going for a more minimalist look.

15 Tips For Stunning Black and White Photography
This post is in response to a question from Matthew Tapley, who is interested in learning how to improve his black and white photography skills. I hope this article has information that is valuable enough to you that you’d consider sharing it on Facebook or Twitter.
Black and White Photography Tip #1: Shoot in RAW. Many times when I shoot for black and white, the photo just doesn’t turn out right when I finally review it on the computer. By shooting in RAW, you’ll be able to change your mind later if the photo wasn’t as great in black and white as you’d hoped.
Black and White Photography Tip #2: Give your photo some Silver Effex. Silver Effex Pro 2 is a Photoshop or Lightroom plugin that does one thing–make black and white photos look incredible. In theory, you could replicate everything that Silver Effex Pro 2 does using Photoshop, but I have to confess that I have never been able to do it. Black and whites look absolutely stunning in Silver Effex Pro 2. The program is a bit pricey, but it is worth the money if you love black and white. In fact, when I look at black and white produced by other photographers, I like to think I can tell if Silver Effex Pro 2 was used on the image.


Black and White Photography Tip #3: To visualize in black and white, only pay attention to lines, shadows, and shapes. This trick is very helpful to aid photographers in pre-visualizing a black and white image even though we live in a color world.
Black and White Photography Tip #4: Pay special attention to noise. With the outstanding low light performance of modern DSLR cameras, in addition to the noise removal programs at our disposal, photographers are used to getting away with noise.
Black and White Photography Tip #5: Look for contrast. In my experience, the best black and white photos usually have some portion of the photo that is near to pure white, and some portion of the photo that is near black. This increased contrast adds interest to the scene.
Black and White Photography Tip #6: Find a wide range of grays. Having white and black in the image will help add interest to a picture, but if other areas do not have a wide range of varying tones of gray, the photo will most likely look dull. You can achieve a a wider range of grays by using flash to throw highlights and shadows over certain areas of the photo.

Black and White Photography Tip #7: Use a polarizer. When shooting around reflective surfaces such as water or leaves, use a polarizer to cut the reflections of the sun’s light. When color is removed from the photo, these specular highlights can be distracting the overall composition.
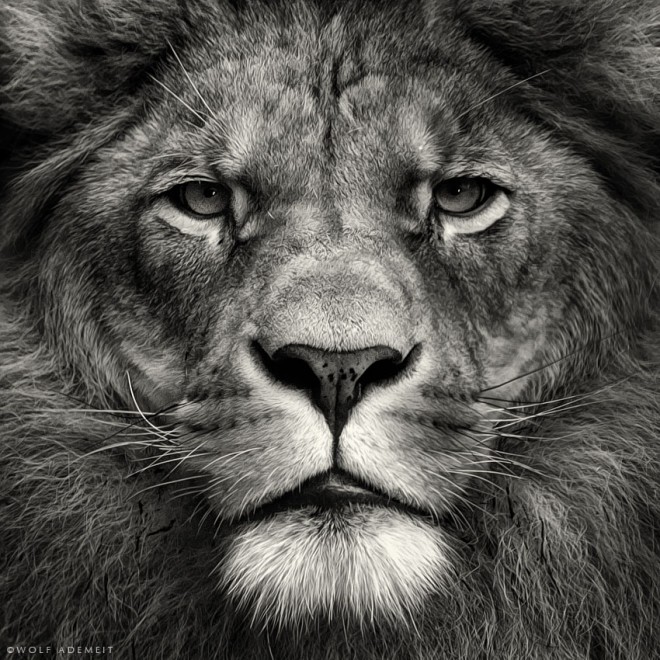
Black and White Photography Tip #8: Watch for texture. As long as texture is not front-lit, it will show contrast in fine details, which makes it a compelling subject for black and white. This is why black and white photos of old items such as barns or antiques are so compelling–they have a lot of weathered texture.
Black and White Photography Tip #9: Use the correct terminology: Black and white, monochrome, grayscale. “Monochrome” means that a color is placed on a neutral background. Therefore, black and white images, which put black on a white background, are a type of monochrome image. Grayscale is merely a way to show black and white images on a computer, which uses a reduced set of shades of gray.
Black and White Photography Tip #10: Look for patterns. Patterns are interesting because of their ordered repetition. Color merely distracts us from giving the pattern our attention. By using black and white, images of patterns are far more compelling. Once you start looking for patterns to shoot in black and white, you’ll notice them everywhere: cars in a parking lot, the shoes of a wedding party standing in line, or a row of bushes.
Black and White Photography Tip #11: Long exposures love black and white. I read this tip on the fantastic Digital Photography School website and decided to try it on an image that I took a few months ago. I didn’t like the picture and had almost deleted it until I read that tip and applied black and white to the photo.
Black and White Photography Tip #12: B&W isn’t a replacement for bad lighting, but it can soften the blow. The photo of the deer on this page is an example of a photo that looked terrible in color, but which looks nice in black and white. I shot the photo at high-noon. Because I used a polarizer, I was able to cut out the reflections on the leaves and mask the fact that it was shot in terrible light.
Black and White Photography Tip #13: Don’t get fooled. I confess to have made this mistake many times. Sometimes I have shot a photo that includes very little color. For example, a close-up of a penguin, or a night sky, or a dalmatian dog. When I see these photos in Lightroom, I often reach for the black and white tools immediately, but I am always disappointed. If the photo is practically colorblind to begin with, it probably won’t look as good in black and white as in color.
Black and White Photography Tip #14: Shoot in HDR!!! I’m actually surprised how little attention is given to black and white HDRs on the web. I am so convinced of the merit of the black and white HDR that I spent an entire chapter in my HDR eBook talking explaining how to do it. HDR is great for black and white photography because it exaggerates the dynamic range and edges. Nothing pops quite like a black and white HDR.
Black and White Photography Tip #15: HSL is the secret sauce. The last black-and-white tip is probably the most important. When post-processing a black and white, you absolutely MUST tweak the colors in the HSL panel in Photoshop or Lightroom. An exact tutorial on how to do this would be a blog post of its own, but your black and whites will look TEN TIMES better with an HSL adjustment.
Ref : Jim Harmer
How to master black and white photography
Black and white photography: See in tones
Our eyes see in colour but to be successful in black and white photography it’s important to train them to see the world as tones of grey.A red flower in a green field may look great in colour, but when converted to mono, if those colours reproduce as the same shade of grey the result will be a very dull picture.
It takes time to develop an eye for mono. One way to help it along involves taking a photographic grey card out and comparing it with objects you encounter. Ask yourself, would that colour be lighter or darker than the grey card?
The best black and white photography exploits the differences in tone between elements in a scene, which can either be photographed ‘straight’ or manipulated either by using on-camera filters, or Photoshop. Great black and white photos also make good use of shapes, textures, lines and lighting, to compensate for the loss of colour.
Black and white photography: Atmosphere
Fog, mist and haze all have the potential to lower subject contrast and create a soft, romantic feel to an image.When it’s misty or foggy out, the world is almost transformed into a naturally monochrome wilderness populated with enchanting tones and an eerie stillness. Bearing this in mind, why not get out and about next time a mist rolls in off the sea or a fog settles for the evening?
Remember that objects and features closer to the lens will tend to show heavier tones than elements that are further away, so bear this in mind when composing your shot.
Black and white photography: The classic subjects
Paring down the image to a range of simple tones often leads to a purer rendition.The classic subjects for mono treatment include documentary, landscape and portraiture.
Travel photography lends itself to a documentary approach rather than just a record of tourist attractions.
Alternatively choose a subject close to where you live, and remember to visit often and shoot plenty so that you can build up a story over time.

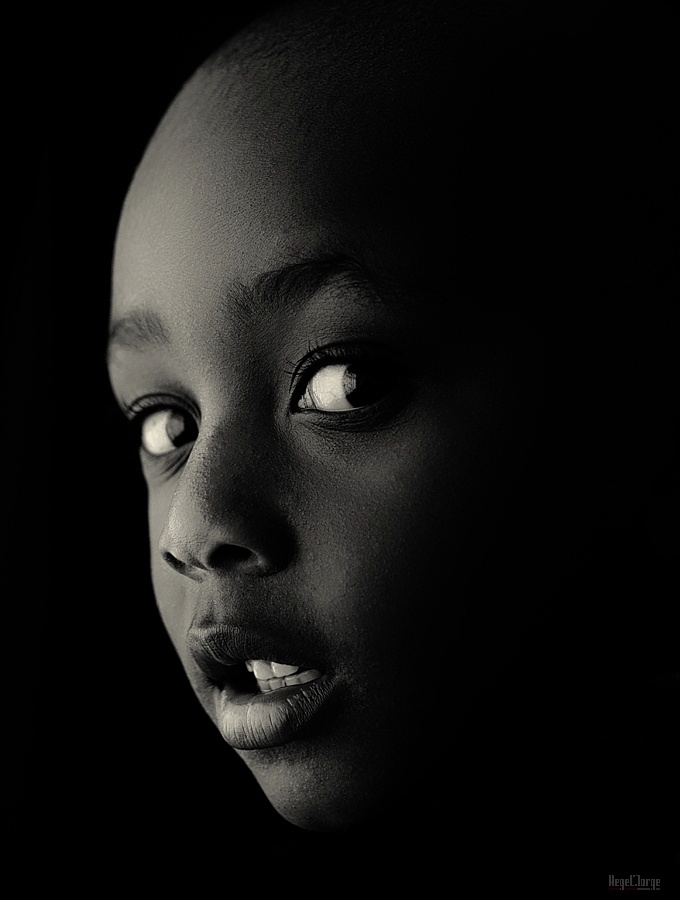
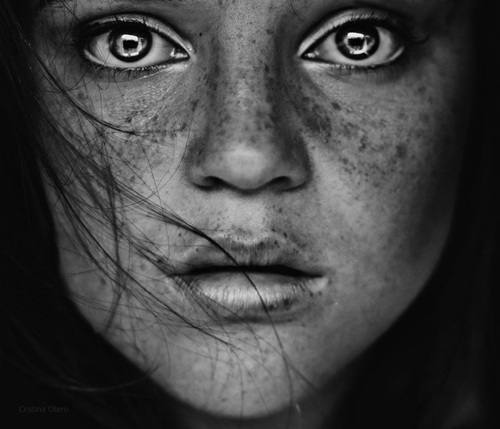
Portraits often look stronger in black and white because, without the distraction of colour, the emphasis is on character, expression, and revealing ‘the soul’ of the subject.
When reducing landscapes to monochromatic tones the composition becomes more important than ever. Make the most of your foreground, remember to include a focal point, and use leading lines and graphic shapes where possible. Monochrome can make a brooding feature out of an overcast sky so it’s a good way to go when the weather is against you.
Black and white photography: Create contrast
Tonal contrast is important in all types of photography, but especially in black and white photography. Whether a low contrast image a high one the contrast level can have a profound effect on the mood and atmosphere.A natural way to add contrast to your image is through choice of subject.
Even if the lighting is dull, a well-chosen muse will offer a striking tonal contradiction. For instance, a black sheep among a white flock will naturally be a source of contrast.
The quality of the light and its direction are two other important factors that will influence the amount of contrast present in a scene. Out of doors direct sunlight creates hard shadows that offer plenty of opportunity to create images with strong contrast.
You can influence the direction of the light by moving your position and shooting at certain times. Low angled light, for example, helps define form and makes for interesting shadows, so try shooting in the morning or late afternoon.

Black and white photography: Using in-camera black and white
Undoubtedly the speediest way to produce a black and white photo is to let your camera handle the conversion.Most DSLRs have a monochrome mode so it’s worth exploring this creative alternative.
You’ll need to use your camera’s menu system to access the processing parameters. Here, in addition to contrast and sharpness you can play around with coloured filters. Yellow or green can be good for skin tones, whereas red can cut through the haze in distant views.
Many models also boast funky toning effects – try sepia for a vintage feel, while blue can add a cool tint to an architectural scene. In-camera black and white, although the fastest method of conversion, offers the least flexibility. In particular, saving your image as a monochrome JPEG means that you won’t be able to access the separate RGB channels at a later stage should you wish to.
Therefore, if this is the case it may be prudent to save two versions – one as a JPEG that you can use then and there, and one as a RAW image, which can be processed later on if needs be.

Black and white photography: Shape and form
Concentrating on interesting shapes can be a great way of crafting a bolder image.To appreciate an object’s outline there needs to be tonal variation between subject and background. Reducing your focal point to a silhouette is a marvellously effective method to achieve this.
Base your exposure on the bright background, take an average reading, and be sure to select a foreground subject that is easily recognised.
Understanding the impact of form on your final image is also useful for black and white phtoography. For example, having the sun at your back certainly ensures even illumination, but sadly produces an image that often looks flat.
However, simply adjusting your relationship to the light can have a great improvement. Moving to an angle of between 45° and 90° will give a heightened sense of volume by placing useful shadows on the far side of your subject.

Black and white photography: Patterns and textures
Following on with the concept of contrast, have a hunt for striking patterns and textures.One way that you can make a study of patterns is by keeping an eye out for recurring themes. Looking at architecture and public structures should yield some promising subjects.
Consider using a telephoto lens to ‘stack up’ the image elements one on top of the other.
A large aperture can be useful here to help to pick out one plane in particular and thereby establish a focal point.
In order to avoid camera shake when handholding, ensure that the shutter speed equals the focal length. Alternatively, gain access to longer shutter speeds by using a tripod.
Alternatively to, or in fact concurrently with, textures, many objects and surfaces have interesting textures which lend themselves to black and white.
However, without the right kind of lighting this can go unnoticed. Imagine for a moment the surface of the moon. The craters nearest the terminator are the easiest to distinguish because sunlight is striking them obliquely creating highlights right alongside strong shadows. Scale this down and the same kind of harsh, slanting light can be just what’s needed for bringing out texture. Use direct flash or a spotlight and position it low and to one side. Effective lighting really is the key to revealing texture.
Black and white photography: Use filters
Coloured filters have long been associated with black and white photography. This is because they have the remarkable ability to lighten their own colour, while darkening their opposites.For example, a red filter can turn a blue sky almost black. It’s worth noting that digital cameras often offer a filtering option already built into them, meaning that you can have a play with this effect in-camera before investing in an expensive set of filters.
The humble polariser is a filter worthy of consideration here too, due to its ability to remove glare and saturate skies. The impact this can have when it comes to post-processing is striking.
Depending on the situation, a polariser can either heighten or lessen contrast, so sample with the filter and see what produces the best results.
Another useful filter for black and white photography is a neutral density (ND) filter. Allowing extended shutter speeds in bright conditions, using an ND filter allows more control when shooting moving water, for example, and can mean more post-production creative freedom.

Black and white photography: High-key and low-key
The techniques of both high- and low-key lighting lend themselves naturally to black and white photography.A high-key image is conventionally bright, and composed primarily of highlight tones.
To achieve this look, seek out naturally light subjects, being careful to ensure that your camera meter doesn’t turn your bright areas into mushy grey (you may have to set +1 stop exposure compensation or more).
Or overexpose to make your shadows midtones, and your midtones highlights. This technique can be great for high-key mono portraits.The opposite is true for low-key images, which are conventionally dark, comprising of a range of either dark, or completely black, areas punctuated with highlights to complete images with extended contrast.Normally a singular, directional light-source in a room with little or no available light will produce the best results.
Again, the technique is suited perfectly to black and white photography, with portraiture and still-life being the easiest and most rewarding subjects upon which to attempt it.
More : Macro Photo tips